Creating an Infosec/IT Blog part 2: A Power User's Guide to Creating a Blog
Blogs are *kind* of a big deal in the InfoSec community. Here is how I made mine.
Published: January 3, 2022
Reading Time: 11 minutes
Creating Your Blog
This is the second part of a series, the first part is where I talk about why you should start a blog. This is the part where I show you how to do it.
Before we get started, there are many other ways to create a blog just by using a web browser such as Medium or Weebly. These are great ways to get your thoughts out there if you’re just looking to create a simple site and you don’t have the time to learn some new tools. I would NOT recommend this guide if you want a simple and quick way to start a blog (and there is nothing wrong with wanting that).
The goal of this blog is to teach you about my process I have developed over the years. This is the way I have found works best for me and gives me full control of my blog and also allows me to automate all of the “admin work” of maintaining my site. A common theme I have learned is that the steeper the learning curve is in the beginning, the more powerful it becomes once you learn it.
While this is not the easiest way to create a blog, I have learned a considerable amount simply from working on this site and I have gotten to the point where I can update/add new material without even having to thing about it, I can run a single command to go from markdown blogpost -> preview page -> published website. Consider this a power user’s guide to creating a website.
With all that being said, I have written this guide to allow for anyone to get a blog up and running, every command, script, tool, and process will be listed below. Ideally you should be able to follow this guide with zero experience in tech and still be able to fully understand what is going on.
Lets Begin
If you are reading this, it is likely that you are using windows as your host operating system. This section will start by installing WSL to get access to Linux tools. This process is super simple. If you’re already running a Linux host you can skip to the next part.
Downloading WSL2 and Ubuntu
Windows subsystem for Linux allows you to access a Linux command line environment without having to worry about creating a virtual machine, or rebooting into a full Linux operating system. To install Windows Subsystem for Linux it is fairly straight forward:
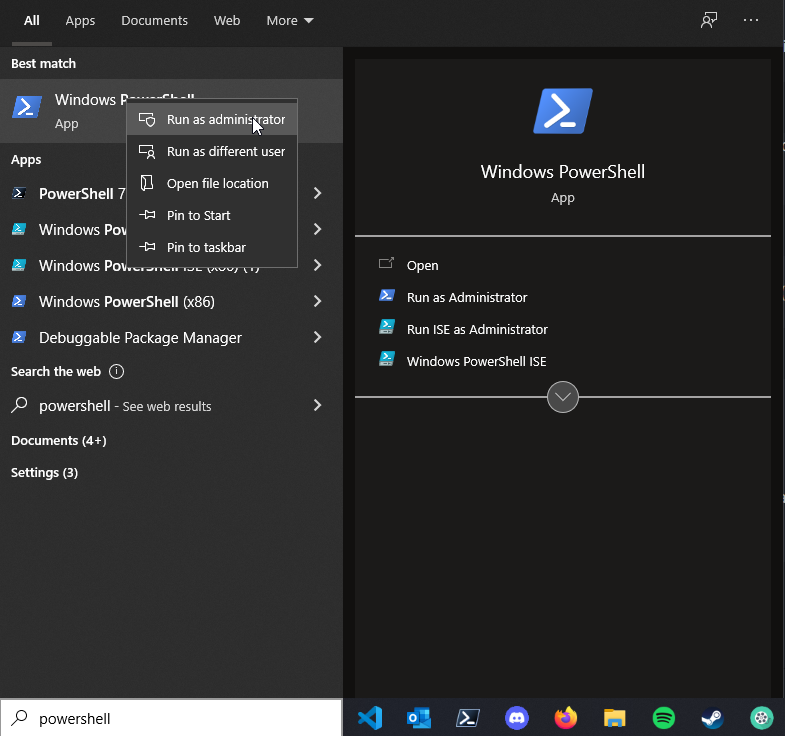
- Search for powershell, right click and click Run as Administrator
- Type the following command to install Ubuntu
1wsl.exe --install -d ubuntu
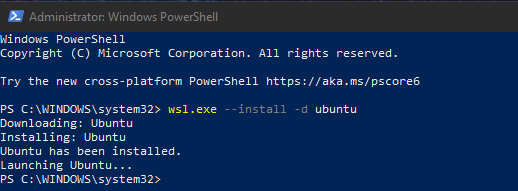
- After Ubuntu is done installing (you may need to reboot), search for it in your search bar and launch it
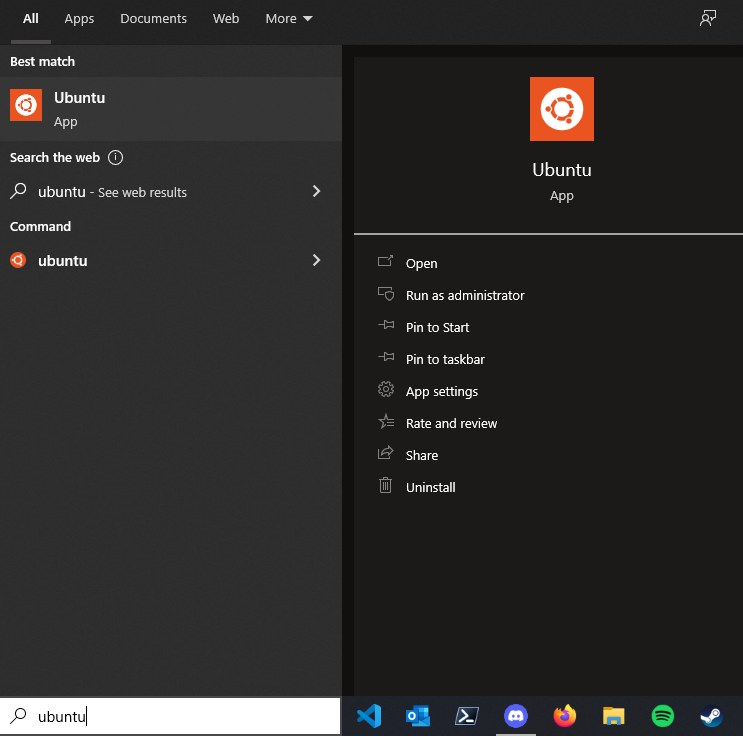
Next, follow the on screen prompts to create a username and password. That’s it, you now have access to a Linux environment in windows!
Installing The Tools
We will need a handful of tools on our WSL environment. If this is your first time using Linux, most Debian based distributions (such as Ubuntu) use the apt package manager. Apt Allows you to install different software (called packages in the Linux world). The first thing we need to do is run the following commands by simply typing them into the Linux terminal
- Update your packages
1sudo apt update
This will tell your Linux environment to grab the latest information on software packages. This needs to be done to tell Linux where to get the software and dependencies we will be installing.
- Upgrade the packages
1sudo apt upgrade
This will tell our Linux environment to upgrade all the software we have installed. The difference between update and upgrade is update is updating the information about the packages and upgrade is actually upgrading our software to the latest version.
- Install the tools we will need
Now that our system is updated, we need to install the tools we will be using. The tools we will need are git, hugo, and xdg-utils. You can install them all using one command:
1sudo apt install git hugo xdg-utils
You now have all the tools you need to create your first site using Hugo.
Creating your first Hugo site
Now that you have all the tools required, you’re ready start creating your site in Hugo
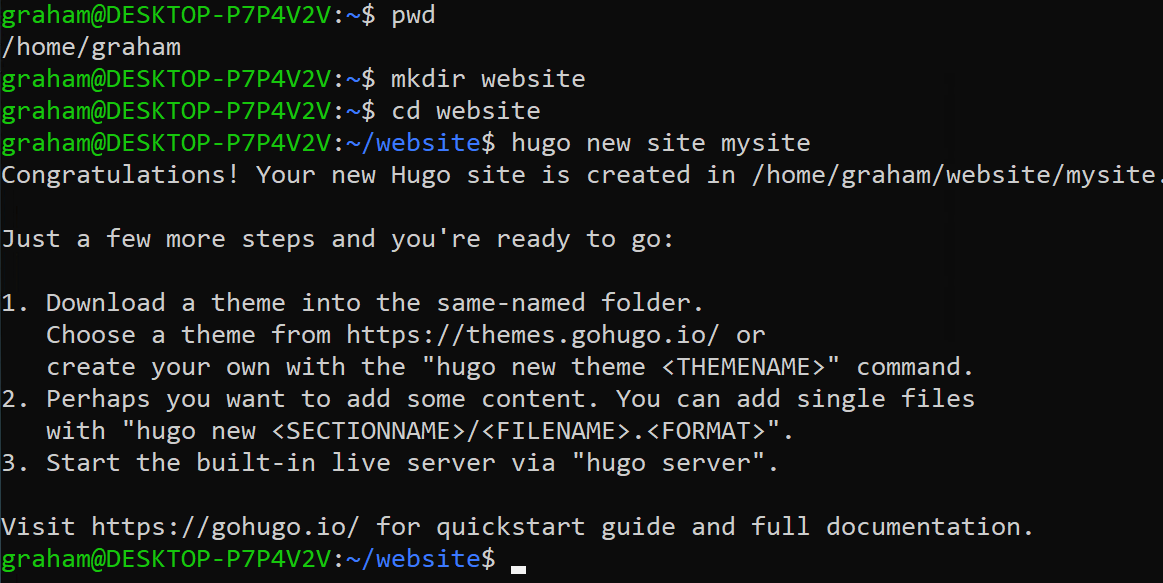
- Go to your WSL window and type the following commands
1cd  # Change to your home directory (by default)
2
3mkdir website # Make a folder called website
4
5cd website # Change directory into that folder
6
7hugo new site mysite # Run the hugo command to create a site titled "mysite"
Finding a Hugo theme
There are slightly different installation methods for different themes, I chose one that seems fairly standard but your mileage may vary. If this is your first time I would recommend finding one with an examplesite folder that you can edit so you don’t have to start from scratch. I will show you how to check for this
One of the great things about Hugo is the ability to quickly switch and edit themes. This helps you quickly get a site up and running without having to touch any HTML/CSS.
- Go to the Hugo theme site and find a theme you like.
- If you want to ensure there is an “examplesite” for you to edit, click the download button. This will take you to the github page where the code for that theme is hosted. Make sure there is an examplesite folder.
- Once you have found a theme you are happy with, you will download it using the
git clonecommand. To do this type the following commands:
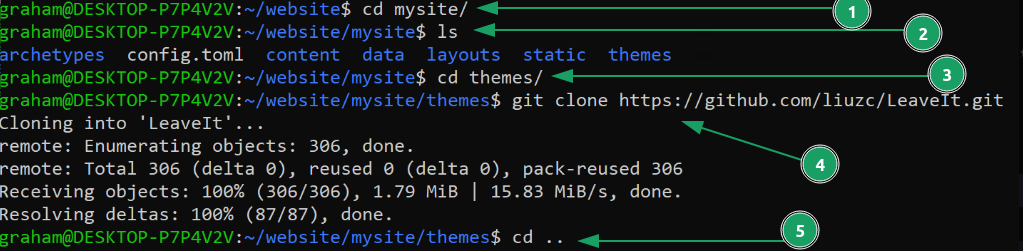
1cd ~/website/mysite/ # Change directory into /home/<yourname>/website/mysite/
2ls # List the contents of the folder, you should see a *themes* folder
3cd themes # Change directory into *themes/*
4git clone <github url to your theme> # Github Theme URL you got when you clicked *download*
5ls # List the contents of the *themes* directory which should now have your theme
6cd .. # Go up a directory
- Now we need to move the example site into our website’s root directory so Hugo knows to display it. To do so type the following:
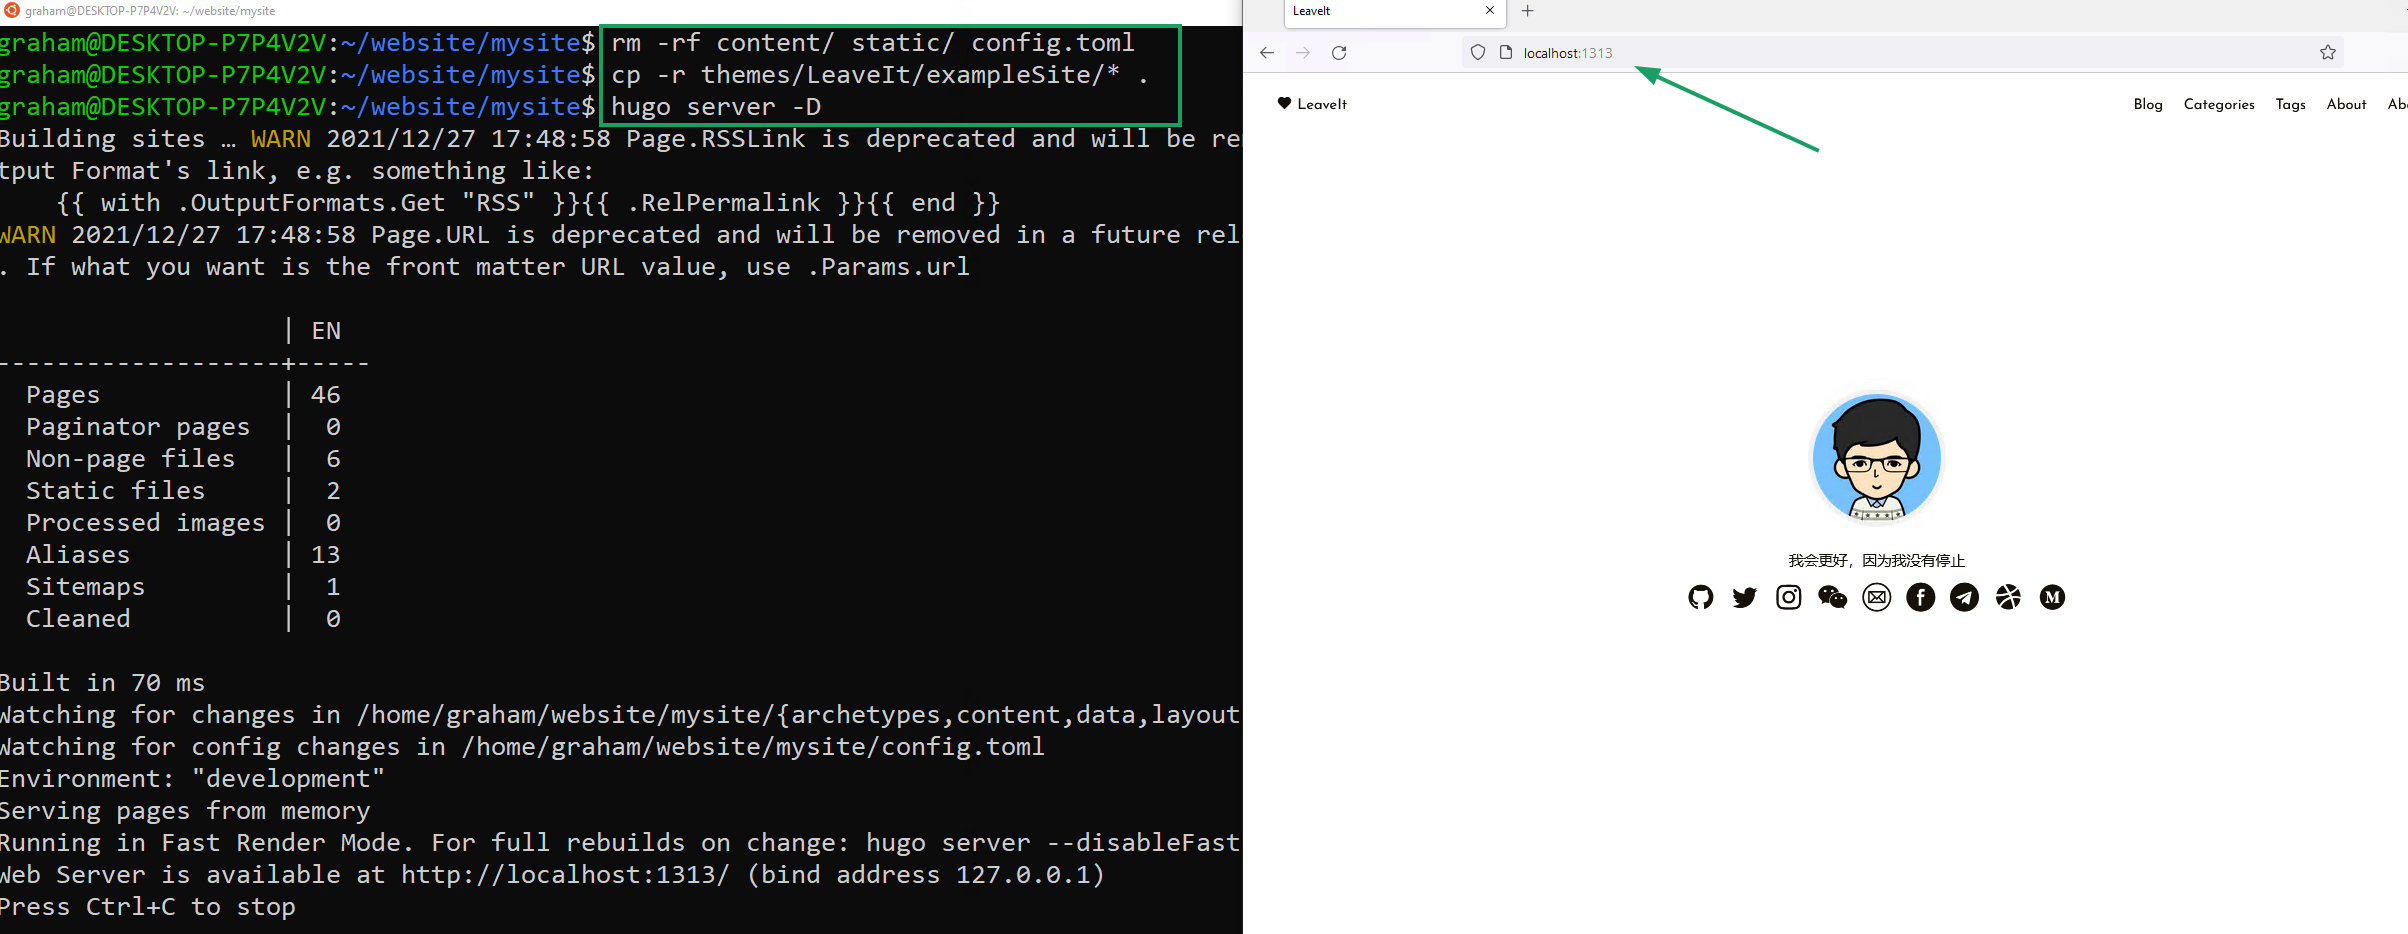
1cd ~/website/mysite/ # Change directory into /home/<yourname>/website/mysite/
2rm -rf content/ static/ config.toml # Remove these files so we can replace them with the ones from the example site
3cp -r themes/<yourThemeName>/exampleSite/* . # <- NOTICE THE period! Copy all the files and folders in the example site folder to your current directory

- Now all we need to do is run Hugo to generate the site.
1cd ~/website/mysite/ # Change directory into /home/<yourname>/website/mysite/
2hugo # Generate the site
3hugo server -D # Generate the site and start a local server so we can view it
Open your web browser and in the URL bar type localhost:1313
You should now see your site!
Note: I have left some great resources below for how to edit pages on your site, edit config files, etc. There are lots of great resources out there that I use all the time whenever I run into issues with Hugo. Use this section to show you how to create a site and the resources below for how to customize your site.
Now for the fun part, we can go about customizing our site by editing the config.toml. There are lots of other great resources for how to customize your website once you have it up, I will link them below.
Buying a domain name
Once you have your website ready for “production” (You want others to be able to visit it) you will need to buy a domain name. To buy a domain name you will have to visit a domain registrar (typically for $12 or less). There are plenty of sites to do this but for this guide I will be using amazon’s route53 since we will be hosting our site in an amazon S3 bucket but it should be noted that you don’t have to buy your domain on route53 for this to work. Typically you can get a cheaper domain name from Namecheap. If you don’t have one already, you will need to create an AWS account.
-
Once you’ve created an AWS account, head over to route53

-
Under the Register Domain section, look for a domain you want. I recommend firstnamelastname.com but this can be whatever you want
- Go ahead and by your domain name at this point.
-
Head back to route53 -> Hosted zones -> Your domain: This is where we will later add DNS records for our site.
Creating S3 Bucket
Now we need to create a place for our website’s files to live in. Typically you would use a webserver for this using something such as Apache or Nginx. We’re going to go with a more simplistic option since our website isn’t going to use any dynamic content that requires a webserver. Since we only need to display HTML files, we can use an S3 bucket as our server. You can think of S3 buckets as a dropbox folder but far more versatile and useful for storing large amounts of data for almost any purpose. Its also dirt cheap (If not free). To host our website, you’ll need to follow a few simple steps.
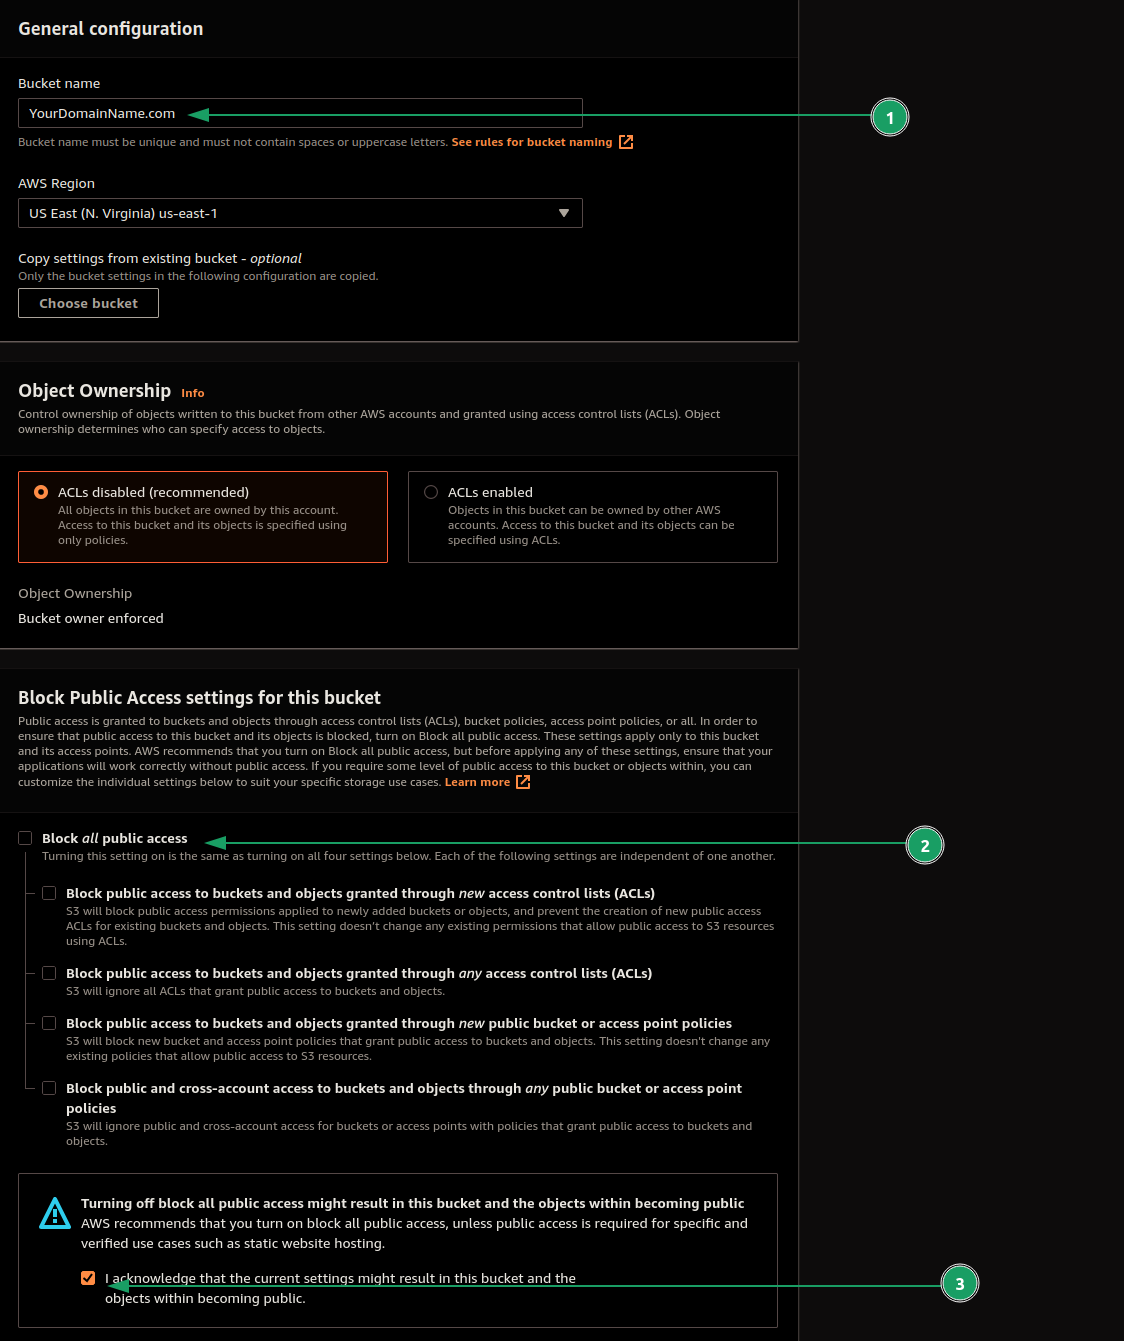
- Go to AWS’s S3 dashboard and click create to make an S3 bucket. Ensure the bucket name is the exact same as your domain name (For example: grahamhelton.com)
- Click on the bucket you just created with your domain name
- Click Properties
- Scroll all the way down to Static Website Hosting
- Click Edit
- Enable Static website hosting
- Type index.html under Index Document
- Click save

- Next we need to configure a bucket policy to allow our website to be publicly accessible.
- Go to your bucket
- Click the Permissions tab
- Under Bucket Policy click Edit
- Paste in the following code to and Change PUTYOURDOMAINHERE.com to your domain (Leave the ** \* **) at the end
 1{
 2    "Version": "2008-10-17",
 3    "Id": "PolicyForPublicWebsiteContent",
 4    "Statement": [
 5        {
 6            "Sid": "PublicReadGetObject",
 7            "Effect": "Allow",
 8            "Principal": {
 9                "AWS": "*"
10            },
11            "Action": "s3:GetObject",
12            "Resource": "arn:aws:s3:::PUTYOURDOMAINHERE.com/*"
13        }
14    ]
15}
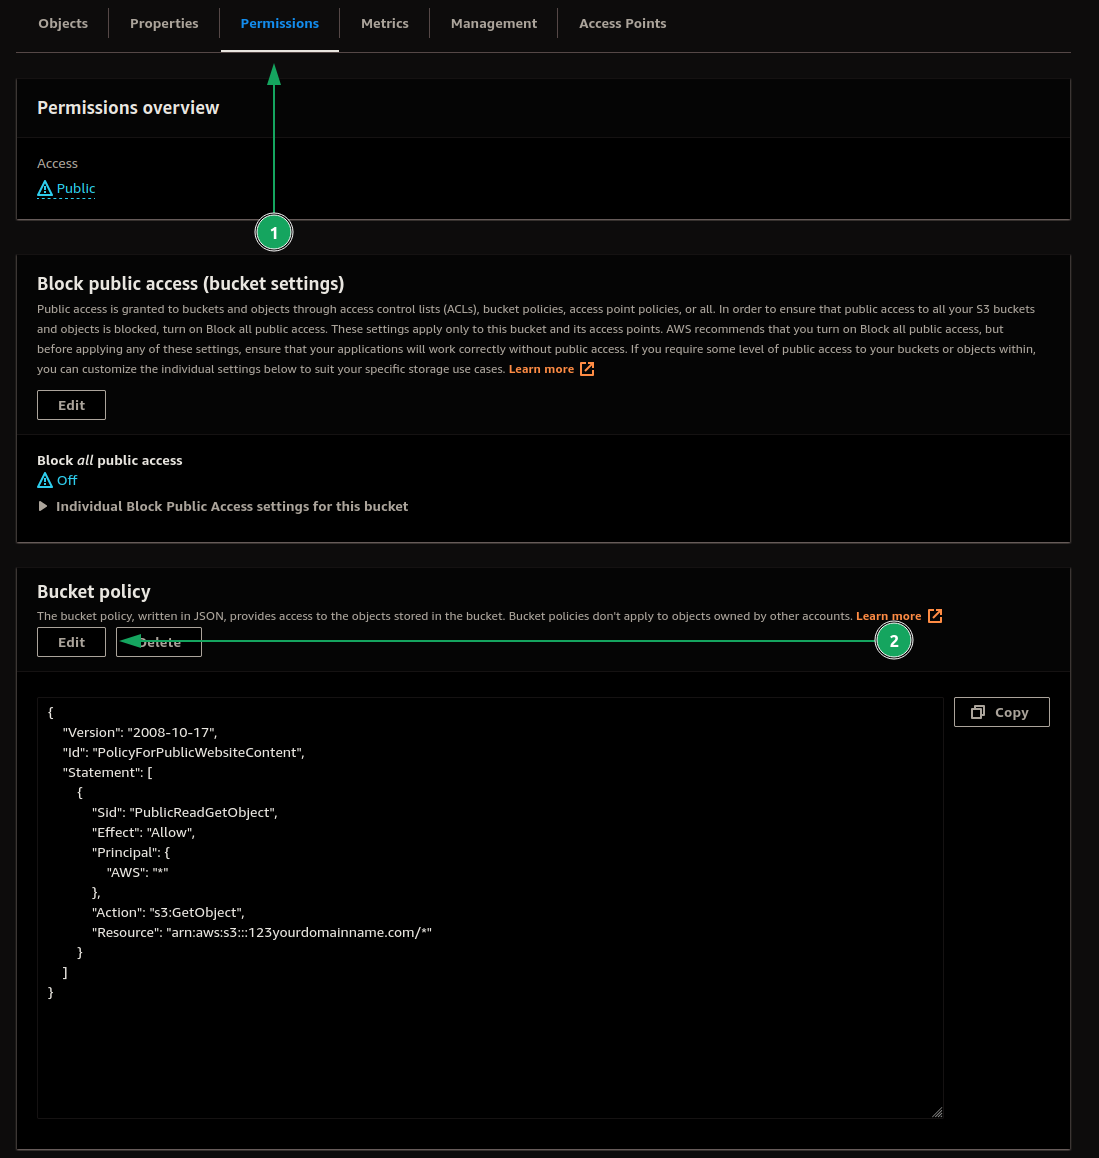
Anything you put in here will be visible to literally anyone, make sure you don’t store data in here that you don’t want the world to see.
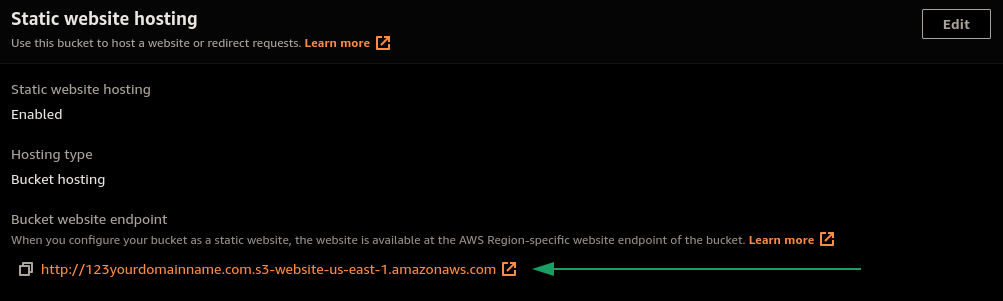
- Go back to the properties tab of your S3 bucket and scroll all the way down. You should now see a link to your AWS S3 bucket. (Note you will get a 404 Not Found when you click the link because we have not added our website files yet)
Uploading site to S3
Now we need to upload our site to our S3 bucket to allow other people to be able to navigate to it. This is relatively simple but I will show you how I automated this in part 3 of this blog.
- Navigate to your s3 bucket and select upload
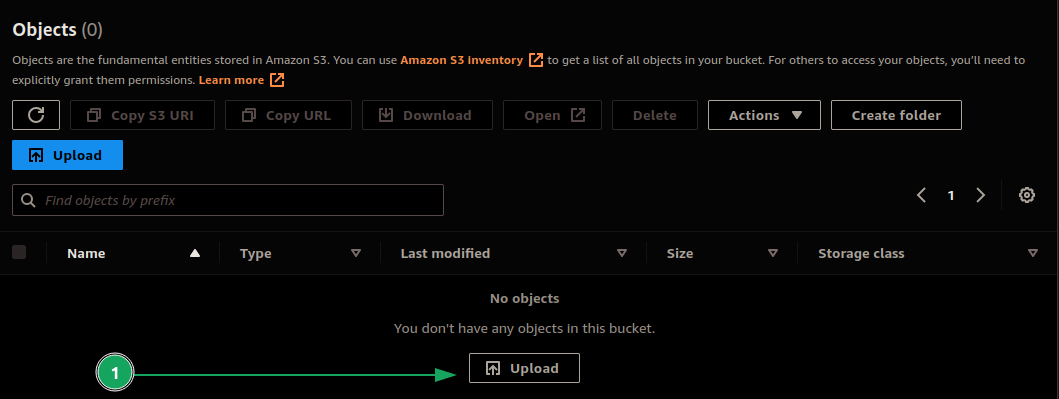
- In your WSL window navigate to ~/website/mysite/public
1cd ~/website/mysite/public
- Drag an drop all the files in public/ into the S3 bucket. “But how do I drag and drop from the terminal?” I hear you ask. Well let me tell you.
- Assuming you installed all the tools we needed earlier, you can type the command
xdg-open .to open your current directory in the file explorer (this will take a few seconds). - If you didn’t install it earlier, use
sudo apt install xdg-utils
- Assuming you installed all the tools we needed earlier, you can type the command
- Now you can drag and drop all the files in the public/ directory into your s3 bucket
Pointing your domain name to your site
Finally, we need to point our domain name to our website files that are sitting in our S3 bucket. To accomplish this we will use amazon’s Route53 which lets us manage our DNS records.
- Navigate to amazon Route53 -> Hosted Zones -> Create Hosted Zone
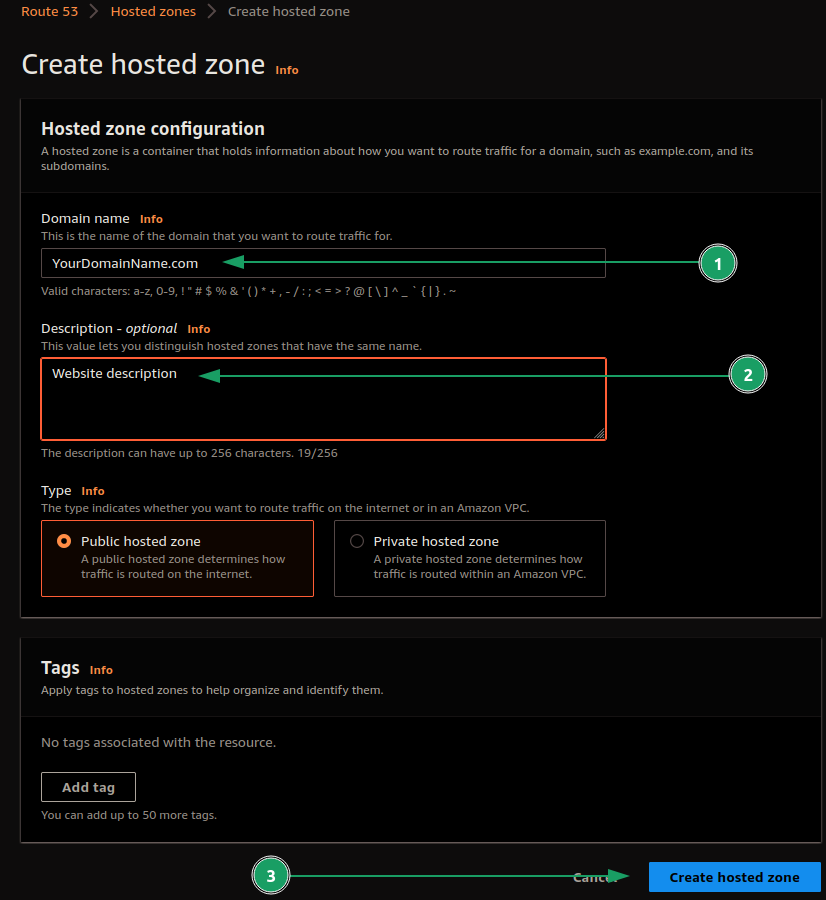
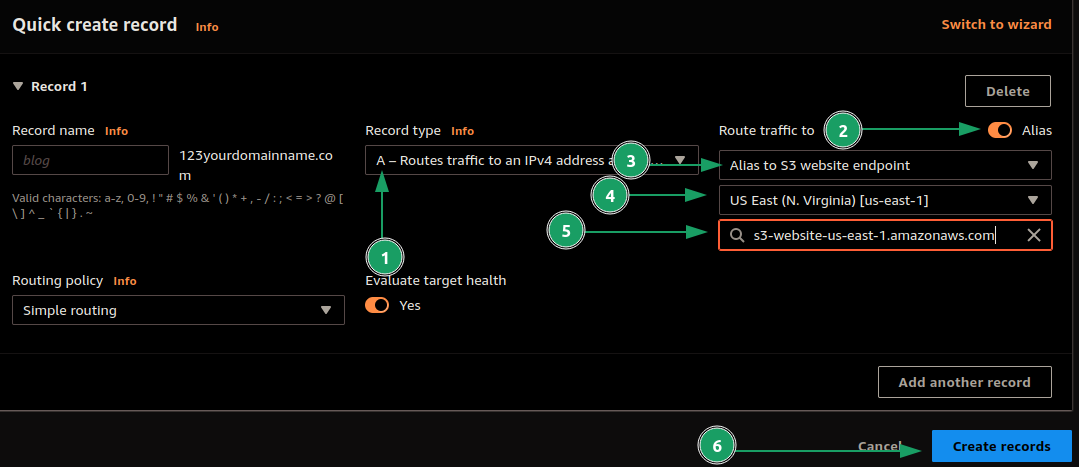
- Click Create Record
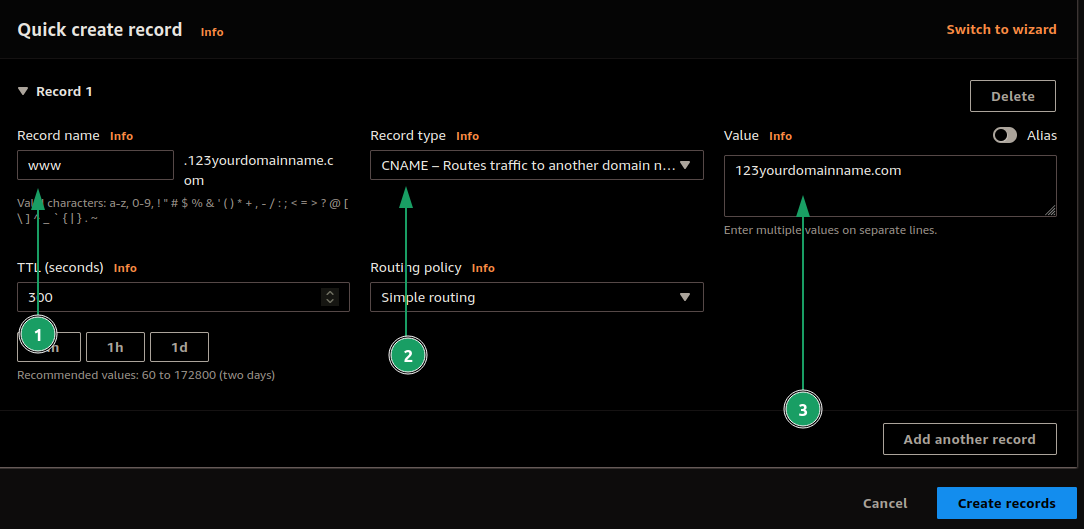
- Create another record, this time a CNAME record to redirect www.yourdomain.com to your site.
That’s it! Now all you need to do is wait for your DNS records to be updated on DNS servers around the world. This can take up to 24 hours but likely will only take a few minutes.
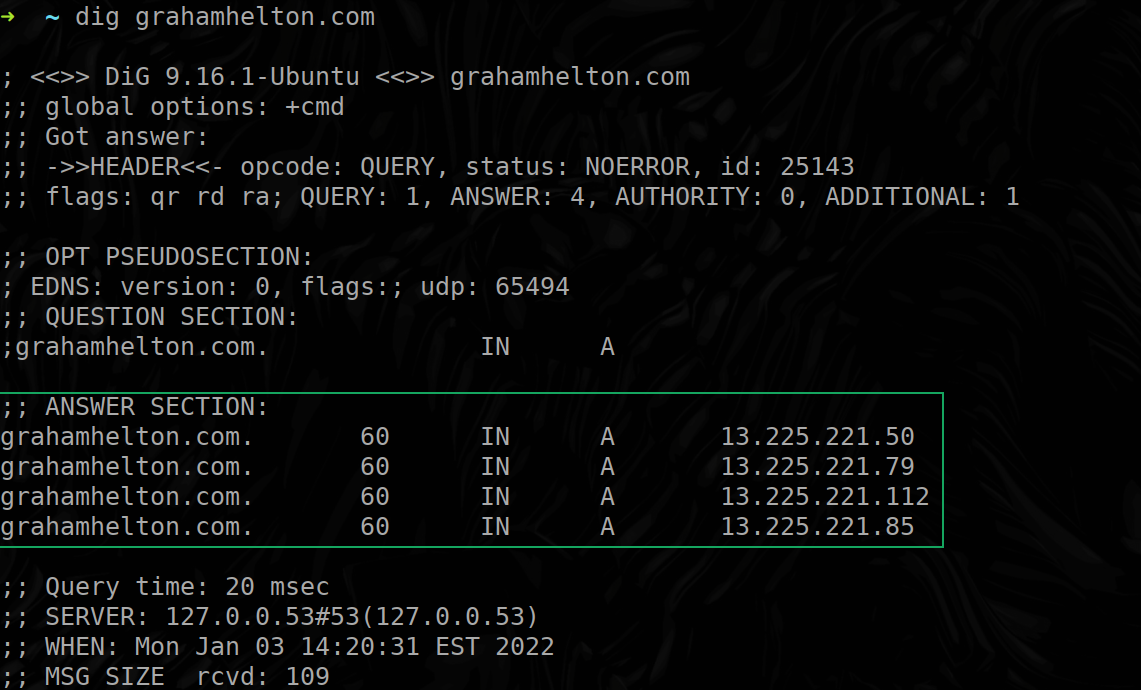
If you would like to see when your DNS records are live, you can type your domain into DNSChecker and see if your records are available. Alternatively, you can check it via the dig command. To use dig, first install it using
1sudo apt install dnsutils
Then type the following command
1dig yourdomainname.com
When your domain name is pointing to your IP address, you should receive a reply in the ANSWER SECTION as show below
Conclusion
If you have made it to this point, congratulations, you should have a working blog using markdown, Hugo, and AWS. If you created a blog with this, let me know on twitter. Creating these very detailed walkthroughs is very time consuming, I would love to hear about it if it helped you.
Part three of this blog will likely be the conclusion of these “How To Create an Infosec/IT blog” series and will cover the more advanced side of things such as automating website maintenance, lessons learned I’ve learned, and shell scripting . I will update this page when part three is released. Have anything you want me to cover? Reach out to me and I’ll see what I can do!